Lightroom Presets used as components…
Over the last few weeks I have been learning Lightroom. Video tutorials and free presets seemed to be a good place to start to get a feel for the tool. In reality the options, their function and the tool took the least time to understand. What took time was establishing the way I was going to use Lightroom Presets.


I never used to be able to modify the image when I used film. So I have always concentrated on getting the image right in camera. Something that has always held me back from caring much about post production editing. What has changed is doing commercial work in difficult lighting conditions, with little control over the environment. Worse still I need to deliver suitable results fast.
Getting good tools is important, but even then we face conditions that are sub optimal. Lightroom, if I could make sense of it, seemed the appropriate way to go. Based on my preparation so far I find myself able to recover problems with a few clicks using the presets I have built. Using photographs from past events and situations I am able to establish the settings that I need.
Lightroom “look and feel” based Presets
What I see with most presets and most video tutorials, is that the use of presets is a configuration to achieve a complete look or feel. Normally to give a style. Sometimes this is a personal style, one designed for a theme or in some cases an emulation of a particular film look from days gone by.
“Unfortunately I have real problems to solve, and only the occasional need for pizazz and pop”
The built-in Lightroom presets fall into this category, being styles or “feels” for images. So it is little surprise that the free and sold presets try to sell a look that you can dress your images with. This allows mediocre images to get attention through pizazz and pop.
Unfortunately I have real problems to solve, and only the occasional need for pizazz and pop. So this approach of taking a preset as a TOTAL starting point and then play with sliders was never going to be a tool I could use. So what now…
Lightroom presets can be specific
The various dynamics, that can be adjusted on an image, are grouped nicely in Lightroom. Lightroom offers finely tuneable sliders for exposure, dynamic range, de-noise, sharpening, lens-correction and more. The problem is that the “fine tune” sliders are far from fast to use and individual images will face an individual “fingerprint” of problems. Editing and delivering 100 images within an hour of taking is hardly feasible with intensive slider work. Yet for social media, presentations or press releases, such a turnaround is critical.
However, there is a solution. Lightroom’s support allows a preset to be specific to an area and not the record of all the sliders as they are set. This means that by creating “versions” of presets for various exposure settings, “versions” for sharpness, and so on, they can be individually or collectively used as needed.
In addition by creating a version of each of the categories set to “0”, this allows a single click to reset an individual attempt without trying to find the change in the history or hit reset and start again.
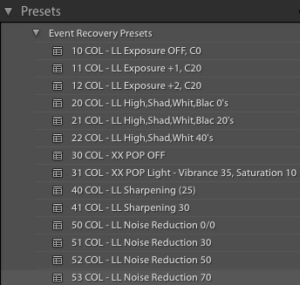
Component Presets in Practice
The first thing I did was to assign a number range to the “category”. So for my model 10-19 are for exposure, 20-29 are for dynamic range and so on. The main point is that they remain grouped in the preset list. In addition I reserve 10, 20, 30, etc for the “reset” or “0” values in the category. This allows me to try 13 “exposure +2, contrast x” and if I don’t like it I can choose 10 and reset it. This can even be done easily having made several changes between setting and resetting.
This way an image needing an increase to the exposure and noise reduction can be achieved with 2 clicks, move on. If I select the wrong level of change, I click the one it should have been. And the results are visible on the image and not the thumbnail… Simple!
My Presets
My next event is coming up in the next 2 weeks, once this is done and I have fine-tuned the presets I will provide them free for others to try. Alternatively build your own using the same principle. It is a good way of learning and the results make for a very ergonomic Lightroom use.
To see larger copies of the band images see the previous Lightroom post.